Well, it's about time I add some new updates to my site. It's been quite a while. I'm doing some reorganizing here so that things are better organized and easier to find. I decided it's better to have things organized according to what part of the project we're looking at, not so much in chronological order on a strict timeline. That's especially important when you tend to jump around a lot, like I've been doing ever since completing the canopy. It will be easier to find things by looking at that part of the plane, then it would be trying to remember when I did it. Seems pretty obvious. So you'll see links for new index pages, for example, for electrical wiring, my panel, and the cowling. Not all of the links are functional quite yet, but I'm working on it. Please stay tuned... lots more coming your way in the days ahead. I have to admit, I'm no guru when it comes to computers or websites. This is an amateur attempt at best. Meanwhile, here's where I'm at right now! I continue to work on some electrical work, my panel, and I'm also working on the engine cowling. I have added some new pages with a new look at where my panel is at. Take a look!
I've written lots of details and posted new pictures in new log entries since March 5th.
What's Going on Here?
Simple. I'm building an airplane!
This web site is my story in words and pictures, documenting my efforts to build my own airplane. "You're building an airplane?" you say? Yes, I am."A REAL airplane?" Yes."In your garage?"Yes."One you can actually fly in?"Yes!"You can do that?"Yes!!!
If you're new to my site, allow me to provide some guidance to help you navigate around here a bit easier. This is my home page, and it's more or less a summary of recent activity, a list of significant milestones along the way (seen below in reverse order), and some helpful links over on the left. I would recommend just scrolling down this page first, to get a glimpse of what this is all about. I will post new milestones below as they happen, so check often! Then click on some of the links to the left, to take you to my other pages that have a lot more detail and pictures. I've devoted an entire page to the big question "Why Build Your Own Airplane?", for example. Under my Construction Log (still a work in progress) you'll see links to menu pages for each major sub-component in the kit, such as my wings, or the fuselage. These pages contain the bulk of the work I've done here and hundreds of pictures! If you wish, you can jump in anywhere you like and follow my progress day-to-day and read and see how an airplane is built, with all the frustrations and joys along the way! Then, I have also included some of my favorite links and some fun stuff, too. Have fun, and please email me if you have any comments or questions. One of the biggest reasons I have done this is to make new friends and to hear from you. So please don't hesitate to contact me. Now, on with the show...
It wasn't all that long ago that I didn't know you could build your own airplane. I had never heard of airplane kits, or homebuilts. So after I studied it and learned as much as I could, I decided to build a high-performance Van's Aircraft RV-7A. What's a Van's RV-7A? It is a 2-place side-by-side aluminum aircraft built from a kit. Van's Aircraft is the manufacturer of the kit. You become the builder. You buy the kit and build your own airplane in your garage or shop. There are a number of kit airplane companies, but Van's Aircraft is by far the largest and most well known. Van's makes a number of different models that carry from 1 to 4 people. The two-place models come in either side-by-side seating or front-and-back tandem seating. You can see them all on Van's website. I chose the model 7A for several reasons. I plan on doing some traveling and I would like my passenger sitting beside me rather than in the back seat. The "A" model has a nosewheel up front as seen in the photo above, as opposed to the RV-7, which is a taildragger. You can build the airplane either way. It's a matter of personal preference. Also a matter of personal preference is the way you choose to paint your airplane when you get it finished. The gorgeous RV-7A seen at the top of this page belongs to my friend, Greg Blakey. I had his picture on this site for a while before I even knew who he was. I just loved his airplane! When I found out who he is, he was flattered that I chose his plane as the featured RV on my website (at least until I get mine finished!).
Now why would somebody want to do something like this? Click on the link and read "Why Build Your Own Plane?" and you'll get my thoughts on the subject. You have many choices and options as you decide exactly what your airplane will be like. Mine will have a 180 hp Lycoming engine, a tip-up canopy, room for 2 plus baggage, a top speed over 200 mph, and nice slow landings. This airplane is fully aerobatic, so I can do loops and rolls and whoop-tee-do's and have all the fun my stomach can handle. It will be day/night VFR at first (that means visual flight rules), with the option of going to full IFR (that means flying on instruments) if I choose to at some point. To top it all off, I live 22 miles from the factory here in Oregon. So I don't have to pay freight or crate charges on my kit. If I need something, I just go down there and get it. How can you beat that? For more information about these marvelous airplanes and on Van's Aircraft kits and how you can do this, too, go to: www.vansaircraft.com. I also have a few links to the left of some of my favorite sites that I check on regularly. This will get you started if you have some interest in looking further.
I put this site together so that family and friends in far away places can follow my progress. I'm also hoping to be an inspiration to some other person who has a dream similar to mine, of owning and flying an aircraft of their own. I'm also hopeful that my fellow builders may find something from my experience that will be helpful to them, as I have found other sites helpful to me.
I guess this is as good a place as any to put in my disclaimer: I've never built an airplane before. This is my first experience. I'm a rank amateur. I'm no engineer or metallurgical expert of any kind. I've never worked with aircraft tools before. Heck, I'm not even a pilot yet! So if you follow my procedures and methods, you do so at your own risk. I am not liable in any way for anything you take from my site. There, we got that out of the way.
Finally, this site also serves as my construction log, for documenting my progress. That's important for airworthiness certification later on, as well as the privilege to do all my own maintenance. I will have to show the FAA that I built at least 51% of this aircraft. That's the rule for homebuilt aircraft. These kits are made to fit the rule, if you follow the plans and do it correctly.
Some Recent mini-milestones:
November 1, 2015 - Posted some new Panel Pages!
My panel is nowhere complete, but I've add several pages of updates showing where it's at right now. I think you'll enjoy seeing my ideas starting to come to reality. Check it out!
November 8, 2014 - A nice day to take her for a spin in the driveway!
Now that my plane is on her gear and I have a tow bar to pull her around, I like to take her outside on nice sunny days! This shot was taken on November
8, 2014. I like working outdoors whenever possible. I was excited because this was the first time I had both halves of the engine cowling in place on the plane! You can see the yellow strap holding it together. I still have a lot of sanding, trimming, fitting, drilling, and so on to get it finished, but it looks pretty good from 15 feet! Also note, I have my spinner now, and it's cut and trimmed, waiting for the propeller that I hope to order soon.
January 7, 2014 - Rear Window is Installed!
After successfully riveting on the top skin on the aft fuselage a week or so ago, the next milestone is to permanently install the rear window. As with the Tipup canopy, I'm using SikaFlex adhesive, rather than drill holes in the skin and plexiglass. I am really pleased how this has turned out! Take a look at the finished product, and click on the page to see more details about how all of this was done.
December 28, 2013 - Aft Top Skin of Fuselage is Riveted on!
After a lot of work installing everything I can think of that goes in the aft fuselage, it's finally time to rivet the top skin in place. Many thanks to my good friend, Mark Cattell, for driving all way over here from St. Helens during the holiday season, to spend an afternoon with me pounding rivets! I'm very grateful for your help, Mark. For those who may now know, Mark built one of the most beautiful RV-9A's you'll ever see in your life. And he's currently working on an RV-14. THANK YOU, Mark!
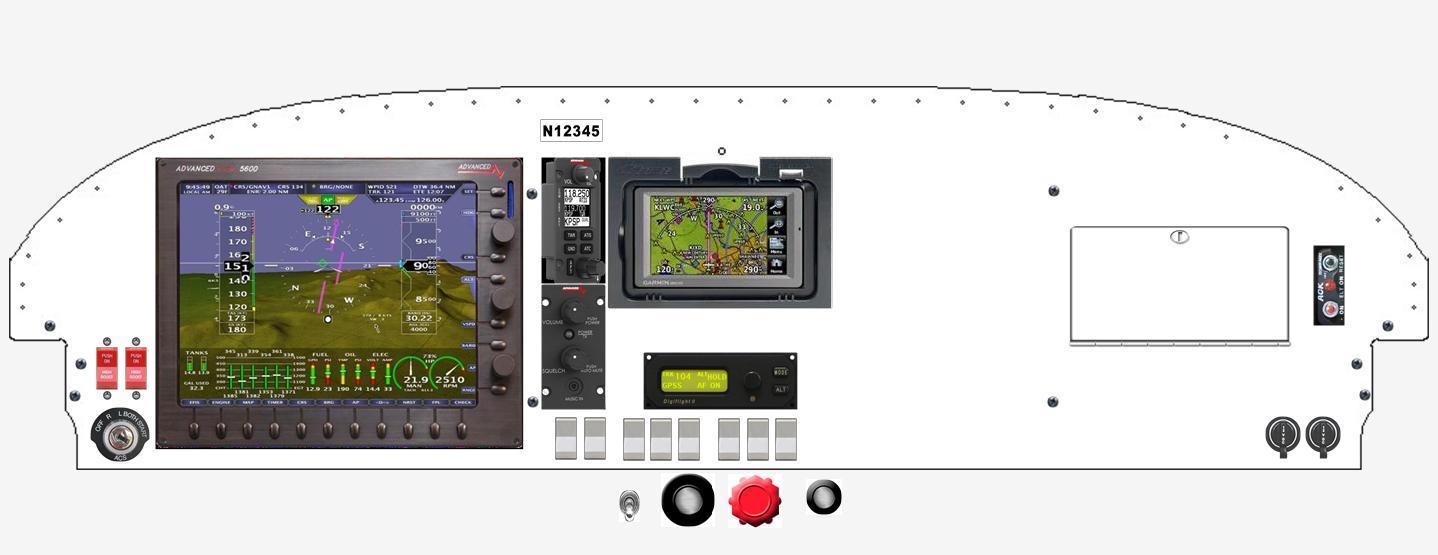
March 9, 2013 - I've finalized my decisions about what I'm going to have in my Panel!
After a lot of thought, reading, studying, and giving it all I've got over a very long period of time, I've made some decisions about what's going in my panel! I've been working closely with Rob Hickman of Advanced Flight Systems. What a great guy! I'm going to have a simple VFR panel at first with the option of going to full IFR at some later date. The primary display will be the AF-5600 EFIS, which is a 10-inch screen. I already have a Garmin Aera 500 GPS, so it's going in, too. Here's a rough draft of what it will all look like. For a much more thorough discussion, click on the image to take you to my page!
December 19, 2012 - The Engine is Installed!
A major event has just happened here. We have the engine installed on the plane! This is a day I have looked forward to ever since starting this project.
I have been particularly focused on getting to this point since finding this engine about 5 months ago. She is now hanging on the nose of the airplane! I had some incredible help from my good friend Mike Rhodes (he has a fabulous finished RV-9A), my Dad, my nephew Philip, and of course, Maya! I also owe a big "thank you!" to my neighbor, Bill, who generously loaned me the engine hoist. I can't believe how smoothly this task went... it all took less than an hour with no major difficulties. Thanks, Mike! I have a much more detailed description in my log, which you can access by clicking on this picture. I can't believe how cool this looks. Or, to put it another way, you could say my airplane is now well hung!
December 8, 2012 - She's on her Gear!
I've been looking forward to this day for a very long time. A good friend loaned me an engine hoist and I was able to use it to lift the fuselage and put her on her gear!. I can't believe how cool this looks!
July 28, 2012 I have an Engine!!
I don't think there's a builder anywhere on earth that wouldn't consider this to be a milestone. I found an engine for my airplane! I'm so excited to have this sitting my shop, I can hardly stand it. A good friend of mine, who isn't even involved in aviation, heard about this and tipped me off. It's a zero-time Lycoming O-360 A4A, that's in beautiful, new condition. And I got a deal on it that won't devastate us financially. This is the last major hurdle for the whole project. Check out my engine page for all the details, and the story of how this acquisition came to be.
1/12/2012/ EAA Chapter 105 Meeting held here at my home/shop!
Way back, before I ever started this project, I started going to monthly meetings that our local chapter held in our area. Every month the meeting was held in someones home, shop, or hanger.
I loved those meetings. It was fun to see a different project every month, in various stages of completion. As I met the guys and got to know some of them, my own confidence grew to the point that I knew I, too, could do something like this. At the time, I dreamed of my own project and perhaps some day hosting a meeting for my airplane in my shop or garage. Well, today that dream came true! Several months ago I was talking to some of the leaders in our chapter and the subject came up, and the arrangements were made. So here we are! I was amazed at how many people came out on a cold day in January to pack my little garage, spilling into the kitchen for lack of room.
I prepared a special page with more pictures, discussion of highlights of the meeting, and a link to a video! The highlight of the meeting was the sacrifice of my original canopy that I cracked last August 4th. Len Kaufman demonstrated his canopy-cracking tool, to the delight of all the onlookers.
Check it out:
7-2-2011 Chapter 105 Pancake Breakfast Fly-in. Our friends Stephen & Missy fly down and take us flying!
Today was our monthly EAA Chapter 105 Pancake Breakfast Fly-in. We have this event every month. This one was extra special for two reasons; first, we had some good weather show up for once. And next, our good friends Stephen & Missy flew down from Arlington, Washington in their brand new RV-7 and joined us. Then, to top it all off, they were generous enough to take both Jamie and I up on flights around the area. Wow, what a day! Here's Jamie in the passenger seat with Stephen helping her get belted in and her headset on:
This was very exciting for her. She's never been up in an RV-7 or 7A, and it's been probably 5 years or more since a short ride in an RV-9A. Thanks so much, Stephen & Missy! She loved it! Here they are, taxiing in after her flight:
One of the best things about this hobby is the great friends and wonderful people you meet
along the way. These people are the best!
Thanks again, you guys, for coming down and giving us a real treat!
11-22-2010 Fuselage Kit is Finished!
After roughly two years of work, I'm finally at a point where I can declare my fuselage kit FINISHED! I've been wrapping up a lot of little tasks that could have waited while I try to figure out a way to get enough money together for the finishing kit. I'll figure that out soon enough. Money has become an issue duing this economy. Meanwhile, this fuselage kit is finished and I'm pausing a bit, once again, to take a deep breath and celebrate a little bit.
Wow! The highlight of the fuselage kit was assembling the wings and tail components together for the first time several months ago (picture below!) outside on my driveway. That was a moment I'll never forget.
Meanwhile, here's my finished fuse as she sits now, waiting for her canopy:
10-15-2010! My Friend Stephen Christopher takes me Flying!
I'll tell you what. One of the best things about building an RV is the friends you'll meet along the way. I met Stephen Christopher a couple years ago. He was building his RV-7 up in Arlington, Washington (near Seattle) at a smoking hot pace and soon passed me up and roared to the finish line. We have stayed in touch and visited each other a few times, as you may recall if you follow my log. I was last up in Arlington a few months ago in July and hung out at his hanger during the EAA Arlington Fly-in and airshow and had a great time visiting them. Well, his airplane is now finished, and he brought his lovely wife Melissa down to Aurora today. I drove down to Vans to meet up with them. Not only did I get to see his beautiful plane, but he took me up flying! What a thrill! It's the first time I've been up in a tailwheel RV. I got some good stick time and really got a good feel for how sweet this airplane is to fly. Stephen was very generous and I feel very fortunate.
Every detail of his plane is very nice, from the comfortable leather seats to the incredible Bose headset. You don't realize how fast you're flying because it's so quiet and comfortable. You won't believe the feel of the stick, how easy it is to handle. It's such a joy to fly!
An experience like this is something you never forget. And talk about motivation! Wow! Read more, and see lots more photos and details here.
8-22-2010 Wings Joined to the Fuselage!
After planning this event for several months, the big day arrived. The wings have been mated to the fuselage for the first time! I had the help of my son, Paul, visiting home from San Diego, my good friend Joe Rottman, my brother Roger and several others. With no room in the shop for the wings, we had to take it outside in the sun. I think I can finally stop asking the question "does it look like an airplane yet?".
You can see the plumb bobs hanging over the front of the wings to check the sweep. Some minor trimming of the rear spar bulkhead bracket will pull everything in line very soon.
It was great to have Paul home, and I'm very happy that he was willing to help me with this important milestone! Read more, and see more photos and details from my log page from August 22, 2010.
6-6-2010 Empennage Joined to the Fuselage!
After sitting on the sidelines for 3 years, the horizontal stabilizer, vertical stabilizer, rudder and elevators have finally joined the fuselage for the first time! This was a very exciting weekend for me, to see big parts of the airplane coming together for the first time.
It was also a lot of fun to hook up the elevator pushrod, reach into the cabin and grab the control stick, and move the elevators up and down. Cool!
Does it resemble an airplane yet? Read more about this and all the construction details on my pages from May 30th, to June 6th.
2-27-2010 Cabin Frame Finished!
The Cabin Frame, or roll bar, is finished! This was a lot of work. Much, much more than I anticipated. But it was probably one of the most rewarding sub-projects of the whole airplane so far. Very little was pre-punched or pre-fabricated for you. I added a special cover underneath, and that took time and work. So now at long last, those rough curved channel pieces that sat on my shelf for a long time staring at me, have been turned into a functional, beautiful, finished part of this airplane. It feels real good to have this done.
Read more about this and all the construction details on my pages from February 26, and 27th.
12-10-2009 Seatbacks are Finished and Installed! HAPPY HOLIDAYS EVERYONE!!
The project reached another milestone today. I finished riveting the seatbacks together a few days ago. Today, with the help of my nephew Philip, we fabricated the hinge pins and installed the seats. I threw in some pillows off the living room couch to sit on. Then, when Jamie came home from work, I grabbed her hand and brought her out to the shop so we could sit in the airplane together for the very first time! This is an RV tradition and rite of passage for all builders... to sit in the cabin and make airplane noises. We just had to crack a bottle of champagne to celebrate the occasion. It's fun sitting here imagining the real thing. Here's our little toast to all of you. Happy Holidays, Merry Christmas, and all the best to you in 2010!
See more pictures and read even more on my log page from 12-10-2009.
8-28-2009 HOMECOMING WEEKEND 2009!
Every year, Van's Aircraft organizes an event called "Homecoming". I have prepared a special page with the details of this years' event. It was very special because Jamie and I had some new friends from Colorado come stay with us, and I had a wonderful time at the fly-in. You can read all about it from my point of view on my Homecoming 2009 page.
8-12-2009 Flipped the "Canoe"!
I've reached another milestone in the project! After months of work, prepping and painting, and lots of riveting, the belly of the airplane is finished and the empty fuselage shell is ready to be flipped over to the upright position. This is called "flipping the canoe" because it has a startling resemblance to a canoe at this stage. So when all the preparations were finished, Daniel helped me with the honors. My daughter-in-law, Andria, held the camera and shot a 26-second video clip as we turned the fuselage over. It was an exciting moment that I've been anticipating for a long time. Read all the details and see more pictures on my log page from 8-12-2009.
Yippee! It's really nice to see it upright! You almost want to grab a paddle, throw in some cushions, jump in and make some canoe noises. <grin> Anyway, the emphasis will now shift from building the shell of the fuselage, to installing things inside the fuselage. In the months ahead, I'll be installing things like seats and seatbelts, floors and baggage area panels, fuel lines and rudder pedals, lots of wires, and oh... this little thing called an instrument panel. Much more to come on that subject.
5-14-2009 Anodized Brake Pedals!
I took my brake pedals to a local shop and had them anodized a bright fiery red color. I love it! More details and pictures on 5-14-2009.
1-20-2009 My First Passenger!
Look at my first "passenger"! My precious little granddaughter, Maya, age 3 came for a visit today and hung out in the shop with "Grampie" for a while. She's the first one to sit in what will be my cabin. Besides being very curious, inquisitive, talkative, and just downright cute, she's such a poser. You can tell she knows what to do when the camera comes out... she strikes a pose.
She decided she loves "Grampie's airplane" and wants to go for a ride. (Shhhhhhh! Don't tell her mom...)
A new RV-Grin! December 6, 2008
On another exciting note, my oldest son Luke got his first RV ride on Dec. 6th at our monthly chapter 105 breakfast at Twin Oaks airport. We were blessed with unbelievably good weather, and with a good friend and fellow RV-builder, Steve Johnson. Steve's newly finished RV-7A is GORGEOUS, and he was nice enough to take Luke up on his first flight.
You don't have to hang around with RV'ers very long before hearing about the famous "RV grin". Check out Luke's! Does it get any better than this?
9-11-2008 Wings are finished! I have started on the fuselage.
Today I finished the last of the riveting on the bottom skins for the wings. It will be easy to remember this milestone, on this historical day. Here you can see both left and right wings in the storage cradle. The cradle also holds the finished horizontal stabilizor and elevators for the tail, in between the wings. The ailerons and flaps have been mounted back on the wings. The inspection cover plates have been put on. I can't describe how good it feels to have this work finished, and have it turn out so good, after all the time spent working on them. It has taken me a little over a year, and a lot of other stuff has gone on around here during this time. But that's the beauty of this project. You work as you can, when you can. I love it. I know I have a lot of work ahead of me, but it's nice to pause at this point, take a deep breath, and admire the progress. To see more about how I built these beautiful wings, go to my Wings construction log.
I must give proper credit and recognition at this point to Jamie. She has been very supportive of this project right from the start. She doesn't mind my obsession with my "aluminum mistress" as long as she comes first. She has even helped me from time to time when I need another pair of hands with riveting! She knows her way around a rivet gun and does a superb job. She is looking forward to flying and traveling adventures together with me. What an amazing woman!
Contact me: swayze "at" europa.com (replace "at" with the @ sign... no spaces... you know the deal. Trying to avoid spam here)
.jpg)
.JPG)
.jpg)
.JPG)
.JPG)
.JPG)
.JPG)
.JPG)
.JPG)
.JPG)
.JPG)
.JPG)
.JPG)
.jpg)
.JPG)
.JPG)
.JPG)
.JPG)
.JPG)
.JPG)
.JPG)
.JPG)
.JPG)
.JPG)
.JPG)
.JPG)
.JPG)
.JPG)
.JPG)
.JPG)
.JPG)
.JPG)
.JPG)
.JPG)
.JPG)
.JPG)