As most builders would tell you, I've been thinking about my instrument panel forever. No matter where you are in this project, or what you're doing, it's in the back of your mind somewhere. You constantly look at all the new stuff coming out on the market, talking with others, reading and doing research, looking forward to that point where you're putting yours together. At the fly-ins you're always looking to see what's new, what's in everyone's panel. Opinions are all over the map, as evidenced by just looking at all the different panels out there and seeing what people have done with theirs. So how do you wade through all this stuff and make some intelligent decisions? I've been wondering and pondering that question for many months now. I'm going to try and elaborate a bit to tell you how I traveled this path, and how I reached some decisions.
A long time ago, I decided to put the panel decisions off as long as possible, because so much has changed in just the last few years. New stuff is constantly coming out. Fact is, we're in the middle of a technological revolution when it comes to aviation instrumentation. When I realized this, I knew I would want to wait as long as possible. Things just keep getting better, and prices keep getting more affordable. I'm also aware that at some point, you have to just jump in. Even though it's completely possible, even highly likely, that by the time you finish your airplane and get it up for the first flight, the panel is probably already obsolete. At least, to some extent with some of the equipment. That all sounds pretty negative, but on the other hand, this is a very exciting time to be building an airplane! I never cease to be amazed at the capabilities we are able to have on board our little homebuilt airplanes!
As homebuilders, operating in the wonderful world of "experimental aviation", just think... we have access to the latest and greatest instrumentation imaginable. We're on the cutting edge. At current prices that just a decade ago were unthinkably high (and still are, for certified aircraft!). Things that the early pioneers in aviation would not have even dreamed of as possible. Who, back in those old days, would have ever thought we could have something like a full glass panel with high-resolution screens, displaying things like synthetic 3-D vision, terrain awareness and obstacles, GPS systems and sophisticated mapping with geo-referenced positioning, onboard weather, databases full of airport information, headsets with bluetooth technology and noise-cancelling capability, audio panels with amazing stereo sound and music capabilities, and autopilots! Not just autopilots, but ones that couple with a GPS to literally fly a flight plan hands-free with unbelievable accuracy. I could go on and on. My little airplane, even with the relatively simple VFR system that I'm starting with, will have capabilities that were unthinkable and completely unaffordable to me earlier in my life. And the best news... for homebuilders... we get to install it and wire it ourselves! At least, that's how I see it. Not something we have to do; but something we get to do. We can do it ourselves and save many thousands of dollars. And we can do the maintenance on all of it, too. Building your own airplane has never made more sense than it does right now, for this reason alone. That's my humble opinion.
Now, of course, if money is no object, you can just hire someone to put your panel together and wire it up for you. You're still better off than you would be with a certified aircraft. All you have to do is drop it into your airplane and hook up some basic connections. But I'm not doing that. The main reason is, even at these prices I can't afford it! So even though I know next to nothing about wiring, the tools used, how to read a schematic, the hardware to use, and everything else that is involved, I'm plunging into this anyway. And honestly, I'm a bit scared! This is the only part of building this airplane that right from the very beginning, has been intimidating to me.
About 10 years ago, when I was considering this project, I joined a local chapter and started going to meetings. Every month, we had a builders meeting at someone else's home, shop, or hanger, and I had a chance to hang out, see lots of projects in various stages of completion, and talk to the guys. One of those meetings really stands out in my mind. The guy was in the middle of wiring his plane, and I remember looking into his open fuselage and seeing a forest of wires in his plane, loose ends going everywhere. I stood there and just shook my head. How was a guy like me, with no training or experience in electrical stuff, ever going to do something like that? Fortunately, the guy saw me and he talked to me. I told him honestly, that this was very intimidating to me. And he said something that really stuck with me. He said "don't look at the forest, okay? Just think of taking one wire at a time, from a starting point to a termination point, and you'll be fine." Wow. Those words really stuck with me. I said "Yes! Now THAT, I can do!" So now, here we are. Roughly a decade later, that day has arrived. It's time to jump in.
So how do you decide what you want, and which products to put in your panel? Well, you have to start with your mission profile. Just what are you planning on doing with your airplane? If you're primarily a weekend recreational flyer, drilling holes in the sky and going out to those $100 hamburger events, a very simple daylight VFR panel is all you'll ever need. My mission, however, involves some serious cross-country travel. Jamie and I have been so anxious to get out there. We just want to go! Go see this great big country of ours and get out there. We want to get out of this rainy climate and go somewhere sunny and warm in the middle of winter. We have relatives in far away places that we want to go see. So a big part of my mission is cross country travel. So that's where I started. A heavy dose of being realistic and looking at the budget means that I will build a relatively simple VFR panel at first, with the ability to upgrade to IFR at some point down the road.
So you've evaluated your mission profile. What's next, glass or steam gauges? This was a no-brainer. It's all glass for me. So which company do I go to? When you're going to put this much effort into building and wiring, and you're going to sit behind it for many hours, and you're spending your money, you feel the need to to all the research, shopping, and so on that you can. Honestly, there's so much out there, you can't take it all in. Or keep up with it all. But I did what I could. I went flying with a few friends, looking at their panels. I asked questions. I read a lot. At the end of the day, here's the deal... truth is, there are a lot of very good products out there. And some very good people. You can easily over-think this, and spend way too much time fussing over a zillion details. How much fussing did you make over the instrument panel in your car? So, I think I would be happy with most any one of them. Dynon's Skyview is immensely popular right now. Garmin's new G3X is very impressive. Excellent systems are also made by MGL and Grand Rapids. But when it came right down to it, I decided to go with Advanced Flight Systems.
Why? First, their products are top notch! They really are on the cutting edge. I like what I learned about the Crossbow AHRS-Magnetometer system used in each unit. It's an uncertified version of the TSO'd AHRS that is widely used in glass avionics for over 600 types of certified aircraft. That gives me a lot of confidence and comfort. Everyone I've known who has an Advanced system is thrilled with it. But what really tilted me in their favor is the personal touch. I've been working closely with Rob Hickman. He and his family are local, so I got to know them real well, and I like them a lot. They're chapter 105 members, and they're wonderful people. Rob is such a good guy. He's so helpful. And they're right here, close to Vans so I can drive down there to get stuff, or see him and ask questions. He personally helped me do a basic panel layout and make some good decisions. That's a biggie to me, since I'm such a novice on all this electrical and panel stuff. He has taken me behind the scenes to see what they're developing and working on. He has even offered to loan me some tools if I need them. I can't get over it. Where else in this world can you buy a top notch product, and the CEO of the company offers to loan you some tools? Amazing! I love homebuilt aviation. And this wonderful community of builders and flyers. If you're thinking about a panel, don't overlook Advanced Flight Systems. Give them a good look. Call Rob and see what they can do for you. Check out their website. There are also a good number of short videos online that you can look at, and get a better glimpse of what they're all about.
So here's what I'm planning on putting in my panel:
Vertical Power VPX Pro (behind the panel). I decided to go with a Vertical Power unit for all the reasons convincingly described on their website. This will greatly simplify my wiring tasks, bring modern monitoring and programability capabilities to the electrical system, and eliminate all the old thermal circuit breakers and/or fuses seen on a lot of old-school panels. There are numerous other benefits. Check out their website! It was also an easy decision when Rob Hickman endorsed and recommended this unit for me.

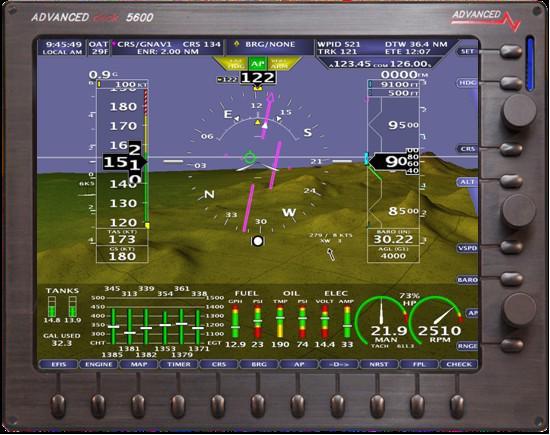
AF-5600 EFIS with 10.1" Display:
AF-5600 Engine board (I don't have a picture)
ARINC Adapter (no picture yet)
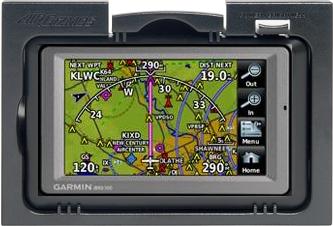
Garmin Aera 500 GPS system (which I already have in hand). I plan on fitting it into an Airgizmo dock in my panel, to allow for easy snap-in, and snap-out. This is because I use it everyday in my car as well! It has dual functions, for aviation and automotive use. Touching an icon on the screen switches you from aviation mode to automotive.
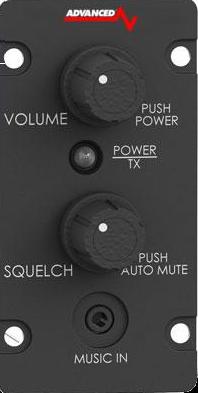
Advanced Flight System's Intercom. It's the same width as the Comm radio and will stack very nicely! After debating the merits of a full audio panel for months, compared to an intercom system, I decided it's not worth the money to buy an audio panel. Especially for a 2-place airplane. This little intercom has everything I'll need. And of course, I can always buy an audio panel later if I just can't live without it.
Advanced's new Comm radio. There is a bigger box that goes with this panel unit, that mounts remotely. This radio will be controlled through the EFIS, but also has the option of being operated in the usual manner. I love it!

Advanced Flight Systems' ATS Digital Transponder (also controlled by the EFIS). This unit is ADS-B compliant, and it mounts remotely. It's controlled through the EFIS main screen.
![]()
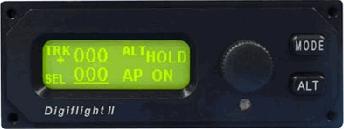
I will eventually install the Tru-Trak autopilot (I already have the servos installed in the fuse and the wing). I'm really excited about the new Vizion A/P. It's amazing! You can get the autopilot in either a round format, or a flat-pack. I'm leaning toward the flat pack, only because I think it will look good next to the other rectangular instruments in the panel.
Advanced's AOA system (I already have the AOA sensors installed in the wing). The AOA will be integrated and displayed on the EFIS screen.
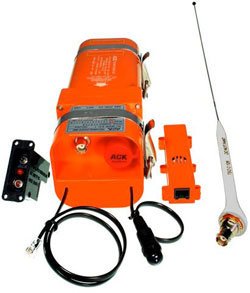
I'm installing an ACK 406 MHz ELT, or Emergency Locator Transmitter, like the one shown here. I have already installed the bracket in the aft fuse behind the baggage bulkhead, the antenna will be right behind my roll bar. I have the wiring in place and I will install the remote in the panel. In other words, I've purchased everything except for the unit itself. It has a lithium battery that's good for about 5 years, and I can't see having it sit around on my shelf for months until my plane is finished. I don't actually need it until I'm through phase 1, and then all I have to do is snap it in place and plug everything in.
I'm also planning on installing an APRS Tracking System. There's nothing to show in the panel picture below, other than a switch to turn it on and off. I learned all about this in a recent chapter meeting, and I'm really sold on the idea and very excited about it! For a very low investment, you can put one of these systems in your plane for very reliable tracking of your flights. It's amazing.
Finally, here's a rough draft graphic of what I imagine my panel looking like at this point. If you looked at this page in the recent past, you will notice some changes. This is my second revision. Come to think of it, I don't think I know anyone who hasn't gone through several iterations of a panel before finally settling on one. Things keep changing so fast!
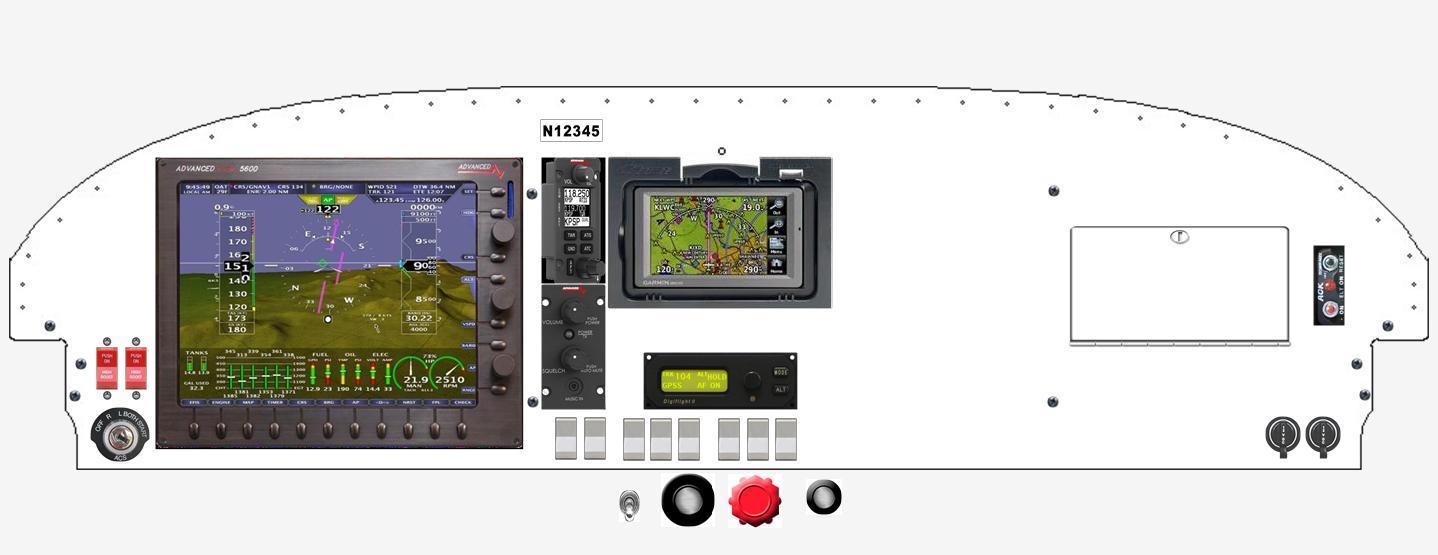
I don't have all the switches and other details labeled here yet, but you can see the basic idea of what I have in mind. This will be enhanced and filled in with more details in the coming days. As you can see, I'm leaving room to the right of the avionics for a future second screen when/if I upgrade to an IFR configuration, an iPad, or whatever. I'm hoping I can fit it in and not have to give up my map box. But if it comes to it, I can get a new blank panel from Vans and do the whole thing, if I need the panel space now occupied by the map box. But that's a long way off. One other question that may come up is why I have two 12-volt cigarette ligher plugs on the right. There are just so many devices these days that need power! I have two of them in my car and there are many times when they are both in use. I'm also thinking I'd like to have one that's switched, hot when the avionics switch is on, and the other one "always on". I can see times when you may want to charge a cell phone, an iPad or whatever, and you don't have to fire up the whole panel to get it turned on. It may also be useful to plug a charger into at times, to charge up the battery without having to turn everything on. It would be on a separate circuit with a safety breaker or fuse. I think this beautiful little panel will take care of my needs for a long time.
UPDATE: Summer 2015:
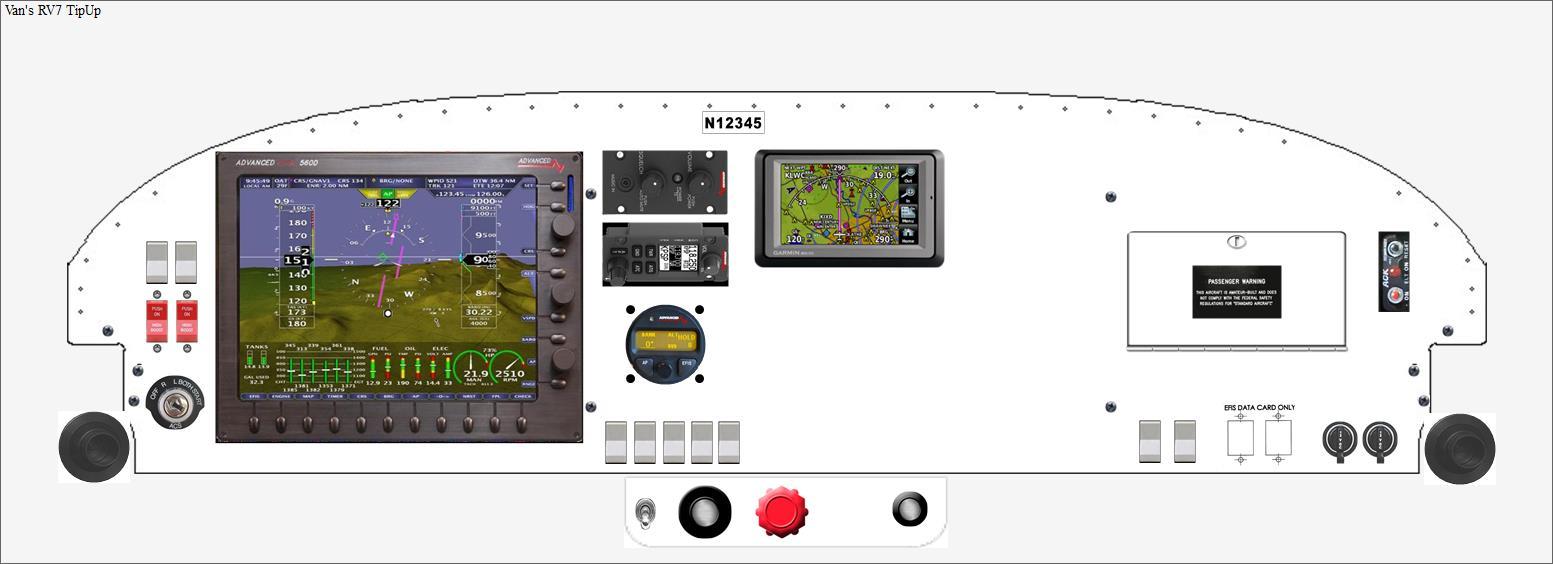
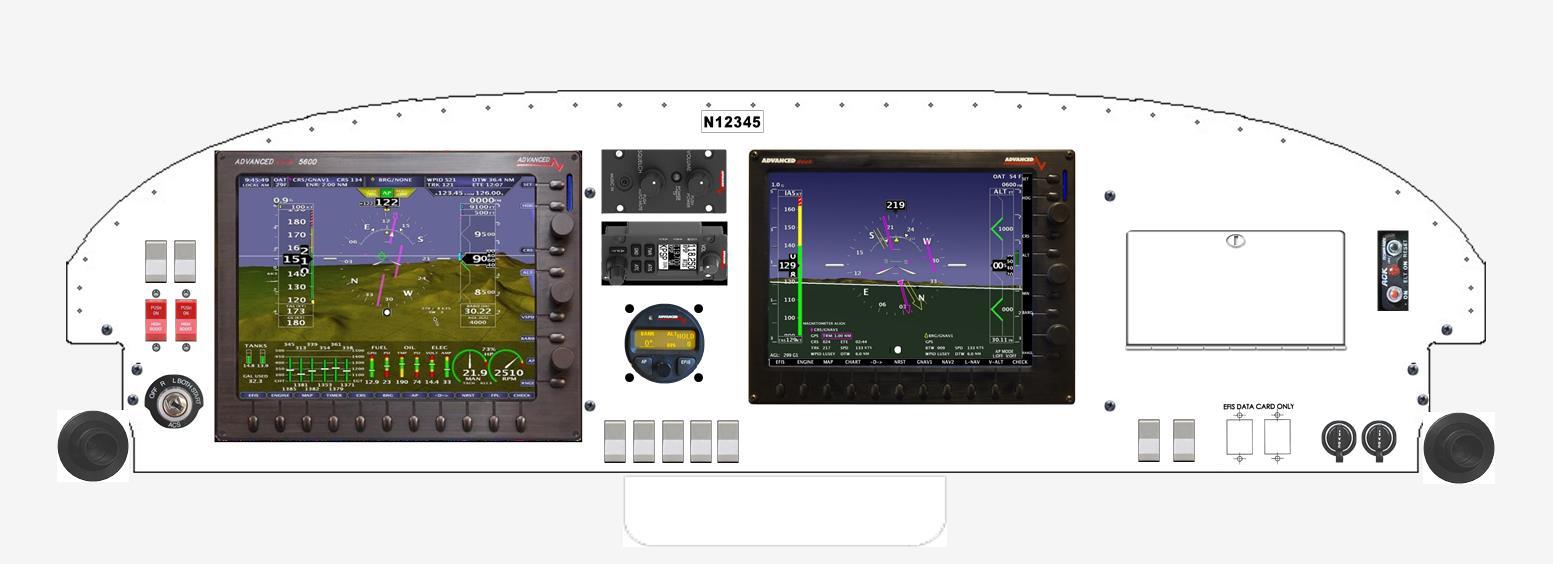
Well, now that quite a bit of time has gone by and I'm finally ready to cut the panel and start installing things, I wanted to update this page. I have another iteration of my panel design, but the following changes will be final. This is what may panel is going to look like unless/until I upgrade some day in the distant future. So here's my latest iteration, with only a few changes from the above image:
Here's my reasoning. The first, most obvious change is that I'm doing away with the AirGizmos dock for my Aera 500 GPS. There are a couple reasons for this. First, they're expensive. About $129 for what amounts to a fancy piece of molded plastic. When I found out that Garmin makes a panel mounted Power/Data cable that the GPS just clicks into, I bought one at a fraction of the price. Here's what it looks like:
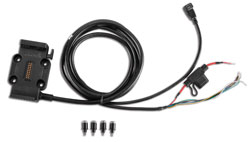
As you can see, it's small and it will be hard-wired to my electrical system and the EFIS, so the GPS won't have to rely on it's own battery power to stay on. It will use the ship's power, like all the other panel components. That leaves the full battery charge available if the panel ever goes dark on me. It will serve as a nice backup with a lot of capability. True, the AirGizmos dock does all of this, too, but another reason I'm going this route is because I don't have to cut a big huge hole in my panel. One small hole for the wire bundle to pass through, and 4 small holes for the screws that hold it to the front of the panel, and that's it. I like that because I'm reserving the option of changing this out at some point for a second EFIS screen, an iPad, or who-knows-what that may come out in the future. It's low profile and it looks even nicer, I think, than the dock.
Another obvious change is that I changed to the horizontal configuration for the COM radio and the Intercom. And I changed from the flat-panel autopilot to the Advanced Flight Systems round one. All of this was to leave room in the design for a future second EFIS screen, while not giving up anything in the meantime. All of these changes also had to do with the arrangements for my switches. It all ties together in the plan. I finally have my all of my switches figured out! And I'm excited to share with you what I'm doing. I've put a tremendous amount of thought and planning into all of this. It really feels good to have it finalized, at least on paper.
I have always favored rocker switches. I just really like them. Vans is now using them exclusively in the RV-12, the RV-14, and lots of other builders are coming onboard with them as well. The trouble for a do-it-yourselfer like me is, I'll be cutting my own panel to save money. Cutting all those precise rectangular holes in the panel is not only a lot of work, but trying to get them all exactly lined up with each other so they look good and not like some amateur hatchet-job is a real challenge. And then... there's all the labeling. Well... Advanced Flight System has taken care of all of this, by using switch panels that have been custom cut and powder-coated, labeled, and ready to go. They're fantastic! Wait till you see them. They're using them in their Advanced Quick Panel design, and all I have to do is cut out one rectangular hole for each switch panel, and put them in. Done! So I'll have three of them... one just to the left of the EFIS, above the key switch with 4 rocker switches in it, another one just to the bottom right of the EFIS, with 5 rocker switches in it. Then, I'm installing a third one below my Map Box on the right of the Panel. This will have 2 switches in it. Details will be coming on the following pages as far as what they're all for. The panel images above don't have an easy way for me to label them, just to show the individual switches and where they are.
The only other small change is that this latest image shows a pair of EFIS Data Card update slots right underneath the Map Box. While it shows a pair of them, I will only be using one for now. This is a slot to insert a data card for updates and downloading data from the EFIS. Advanced Flight Systems puts these on all thier panels for a convenient way to do these tasks. The second one is obviously for a future second screen. I may or may not install both of them at this time. But I'll have at least one, for sure. One other thing I might mention, that is NOT showing. What am I doing for my headset jacks? There is a lot of discussion about this, and a lot of options to choose from. But rather than put them on the panel, I'm choosing to put them farther back on the sub-panel. I was fortunate to do some flying this summer in a couple of different RV's, and while having them right under the panel is fine, the cords are long enough and you don't plug or unplug them often enough to demand that they be right up front. So I'm putting them back out of the way but still accessible. I'm also installing both the standard 2-plug jacks, and the Bose single plug for Bose headsets. I'll wire them together so you can use either one. Nice to have options!
Stay tuned! It won't be long now! I'll be cutting my panel soon and begin installing items in it as I'm able to afford them.
To close my update, I'll leave one more image, showing how a future second EFIS screen from Advanced would fit right in to this panel. All I would have to do is take out the Aera 500, cut the hole bigger, and install the second screen. It would be an AF-5500, just slightly smaller than my primary screen, the AF-5600. The image may give the impression that an AF-5600 may fit, but it won't. These images aren't exactly to scale and trust me, I've measured extremely carefully. There's barely enough room to squeeze it in. But it will go.
<< Previous | Home | Next >>