After a long delay of almost 6 weeks, I'm back at it here. We had a tragic death in the family, and I lost my dear son, Paul. I decided I don't want to use this site as a place to go into it. But if you'd like to read his obituary that I wrote and see his picture, you can go here. And thank you, by the way. Paul helped me numerous times on this project. He loved it, and he loved what I was doing here. I was SO looking forward to being able to fly down to San Diego and visit him. It's so tragic. Anyway, that's why I have been absent for a time. It's been very hard. But I know that Paul would have wanted me to finish this airplane, go flying, and enjoy my life, so after mourning for over 6 weeks, that's what I'm going to do! I'll never stop mourning, but I will live my life to honor him.
So meanwhile, an item that I have been waiting for, for a number of months now, finally came to market and my order arrived here at my home. It's the new canopy latch mechanism from JD Air Parts. My good friend Darwin Barrie, down in Arizona, took this item after two other vendors didn't finish the effort to bring it to market, and really did a top-notch job putting together a super product! Here's a graphic from his website:
There are several things I really like about this canopy latch. First, it's flush to the skin on the outside! Vans standard canopy latch for the tipup canopy has parts that stick out through the side of the fuselage. You squeeze them together to open the canopy. This is much cleaner. Next, this latch is substantially stronger and more solid. Yet, because of the lightening holes and the unique design, it's very lightweight. It is superior in every respect to the little yellow ball and the parts that come in the Vans kit. Here are the two main parts, as they come in the kit. It's amazing to me that these are cut with a water jet! The outer surfaces are then precision CNC machined. Also included in the kit is all the hardware you'll need to finish the installation.

The plans for the latch have you start by making a template out of some .032 scrap that represents the fuselage skin. You cut openings for the latch pieces, then you fabricate the two angle pieces that hold the latch mechanism. I like the idea of practicing on a template before cutting into the side of my fuselage! Seen here are the template I made, one of the two angles, and the latch itself clamped to the bench for drilling the bolt hole through the angle.
.JPG)
Here I'm drilling the #12 hole for the bolt that the latch lever will swivel on. Drilling it this way insures that the latch lever will be perfectly flush with the fuselage skin, because the exact positioning of the hole in the angle is critical. Then, I clamped the two opposing angles to each other and backdrilled through the other angle to finish the job.
.JPG)
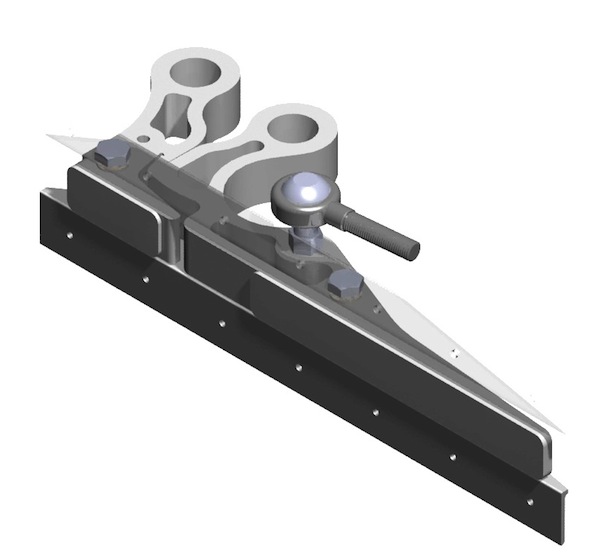
A while later after trimming and finishing the angles, here's the finished assembly! This is obviously the latch in the closed position, as seen from inside the cabin. To open the canopy, you push the two pieces apart, and swing the lever open. The angles have been drilled and clecoed to the template as shown. My next step will be to disassemble this, and use the template placed on the skin on the fuselage to back drill all the rivet holes, and mark the openings for the cutouts.
.JPG)
Here's the latch in the open position:
.JPG)
And here's how the latch looks from the outside. Notice how the parts are perfectly flush. I love this! To open the canopy, you push the "button" on the left in. That releases the lever arm on the right and you pull it toward you just like the standard Vans lever piece.
.JPG)
Another beautiful thing about this latch mechanism, is that it allows for a lock to be installed for your airplane. The ignition switch for my panel came with a pair of locking cylinders that use the same key as the ignition. I may use one of them to install a lock for the airplane. Here's an example, from my friend Bruce H. down in California, of how this is done. Also notice how nice his canopy latch installation came out on his RV-9A.

Here's the inside of Bruce's latch installation, showing the lock he installed. To lock the airplane, the metal tab on the lock swings up into a slot cut into the lower angle and into the cutout opening in the lever arm, preventing the arm from swinging open. Brilliant!

Notice also how he has polished the latch pieces. I plan on doing this as well. These pieces are water-jet cut and have kind of a rough finish as they come. But as you can see, they polish up real nice. You can leave them as is, polish them, paint them, anodize them, whatever you like!
UPDATE: I didn't work on this latch again for a while. At this stage of the project, it's very easy to have several things going on at once, and skip around a bit. I've noticed a lot of builders have done this, and I find myself doing it, too. If you'd like to skip the interim work and go directly to the next steps I took on this canopy latch work, go directly to my page for January 28, 2012.
<< Previous | Home | Next >>